Creating & Using Custom Rules for the Novo Asset Manager
Purpose: The Custom Rules feature allows administrators turn Asset Management into a fully-automated process by having the Novo software trigger actions based on an event and/or a condition.
Prerequisites: Novo initial software settings, Help desk configured, List of events to be automated
Steps:
- Click Admin>Setup, then click Custom Rules in the Assets section. If you also have the Request Management and Knowledge Management applications, you will see links for "Custom Rules" in their sections as well. If you happen to click one of those by accident, no worries, just click the 'Assets' link toward the top of the Custom Rules page.
- Click the Add New Custom Rule button. The Custom Rule Definition window appears as shown below
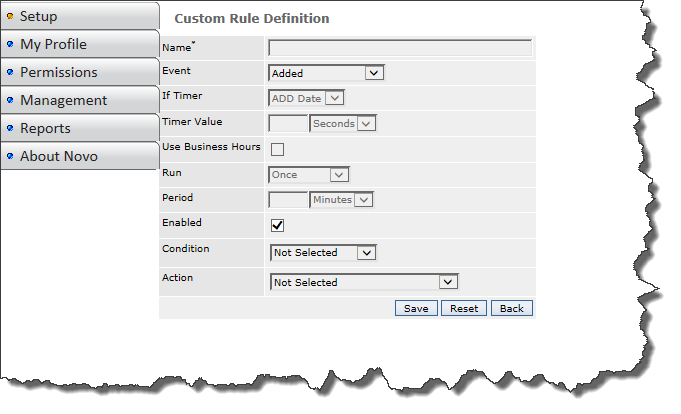
- Enter a Name for the rule
- Choose an Event type from the drop-down list - the options are:
- Added - The rule will run when an asset is created, regardless of who created it.
- Modified - The rule will run when an asset is modified, regardless of who modified it.
- Added or Modified - The rule will run when an asset is modified.
- Timer - The rule will run when the runtimerudr.bat file on the web server runs - Select from the following If Timer options:
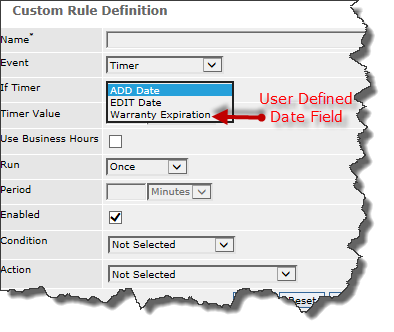
- ADD Date - when the request was created
- EDIT Date - when the request was modified
- Any User Defined Date Fields
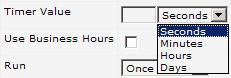
- If needed, specify a Timer Value by entering a whole number in the adjacent field, then selecting one of the IF Timer options shown above. When the runtimerudr.bat runs (discussed in more depth below), the application will calculate the difference between the selected IF Timer option and the value in the Timer Value using the selected increment; (seconds, minutes, hours or days) and run the rule if the server Date/Time has met or surpassed the calculated value.
- Use Business Hours - Select this if you want the Application to calculate timer based rules using the settings you provide on the Business Hours definition page. This control will only be enabled when Timer is selected for the Event type.
- Run - Determine whether a Timer rule should run only Once or Repeatedly. This control, and the Period control below, will only be enabled when Timer is selected for the Event type.
- Period - If you selected Repeatedly above, set the time interval the rule should repeat in Minutes, Hours or Days.
- Enable - Uncheck this to disable the rule.
- Choose a Condition. If no Condition is selected, depending on how it is configured, the rule will run when any Add, Modify or Timer Events occur.
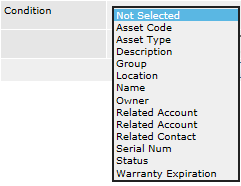
- Once a condition is selected, the screen is updated and two additional drop-downs and (depending on the condition) a selection box or text field will be displayed. These are used to build the condition

-
Build the condition by selecting the values you want from the available options.
In the right-hand drop-down list, select one of the following options:
- Done, if your condition is completed
- And, if you would like to extend your condition
- Or, if you would like to add an alternative condition
- Select an Action to be triggered by the rule. Available Actions are:
- Email request To
- If you select "Email request to...", you can simply type an email address into the "To" field or you can use any the following variables:
| Option | Variable | Action |
| Contact | {CUSTOMER_EMAIL} | Email the contact |
| Assigned User | {USER_EMAIL} | Email the admin user who is assigned to the request |
| Super Admin | {ADMIN_EMAIL} | Email all Super Admins |
| Account | {ACCOUNT_EMAIL} | Email all addresses associated with an Account |
- You can click the Drop Down list to show and select the variables
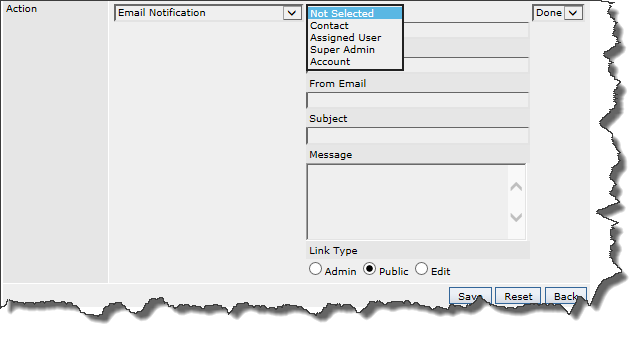
- When a variable is selected, the "To" field below the list is auto-populated

- You can also select several variables within the same action. The example below shows that the Contact and the Assigned User are to be notified.

- More Email options:
- You can choose to set an alternate From email address if you want the notification to be "From" a "No-Reply" address rather than from the System Administrator's email address in Core/General Settings.
- You can also determine the Link type
- More available Actions are:
- Assign Asset To - (any admin user)
- Change Status To
- Update Location To
- Update Asset Type To
- Update Asset Code To
- Update Group To
- Delete Asset
- Add Related Memorized Request
- Append Description with
- Add Note
- User Defined Fields will also be available in this list
- In the right-hand drop-down list, select one of the following options:
- Done, if your Action is completed,
- And, if you would like to extend your Action,
- Or, if you would like to add an alternative Action.
Enabling Timer Rules
To enable the Timer option for Custom Rules, you first need to use the Task Manager in Windows to schedule a task to run the runtimerudr.bat file periodically (for example, 1–5 minutes) so it checks whether the Timer Condition for triggering an Action has been met (for instructions review the Creating Timer Rules subarticle).
Sub Articles
 Creating Asset Management Timer Rules
Asset Timer Rule Examples