How to Schedule a Report to be sent via Email
Purpose: To explain the process of scheduling a report during the creation process. Please also see the following video:
Scheduling a Report.
Prerequisites: Novo initial software setting, Module Configuration, Data within the area of Novo for which you are running a report.
Note: All reports sent to users, whose email client is set to read email as text, will lose the HTML formatting. In order to maintain the HTML formatting, the recipients of the emailed reports, should read the email as HTML.
Steps:
- Click Admin->Reports. The Report Writer Manage Reports page is now visible.
- Click Add New link next to the type of report you want to create. The Choose Report Type page is now visible.
- Run all steps of wizard to the Setup Email Scheduler step.
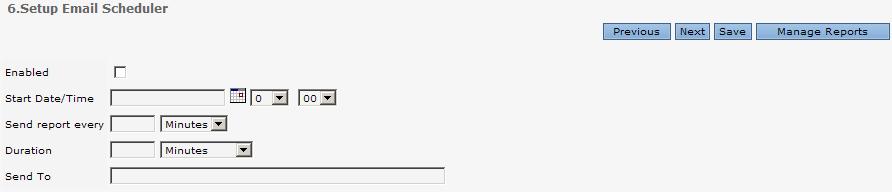
- Click the Enabled check box.
- Enter a Start date and time.
- Enter a frequency time in the Send Report Every box and choose the corresponding type for that value. The types being as follows:
- Minutes
- Hours
- Days
- Weeks
- Months
- Enter the duration for which this report is to be sent and choose the corresponding type for that value. The types being as follows:
- Minutes
- Hours
- Days
- Weeks
- Months
- No End Date
- Enter an email address in the Send To field if you would like this report sent via email based on the timer values inputted above.
Note: Once the report is generated, there is the envelope icon at the top right of the report that will allow you to email the report as well. See the article Emailing a Report.
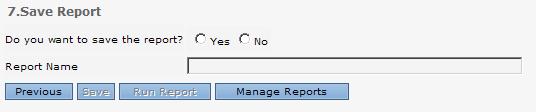
- Click Next to continue to the Save Page.