Using Smart Tags
Purpose: Smart Tags allow you to use email to update certain values on a Request. To edit and use Smart Tags on the Novo Mail Service.
Prerequisites:
- You must have purchased the Novo Mail Service Module to use Smart Tags.
Steps:
To Enable Smart Tags
- Click on Admin -> Setup -> Core/General -> Incoming Email Settings.
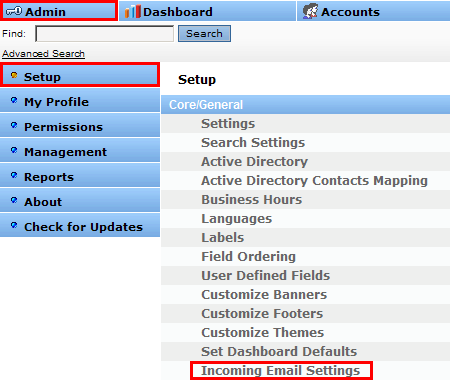
Select
Enable Smart Tags

- Browse to Admin>Setup>Requests>Mail Smart tags
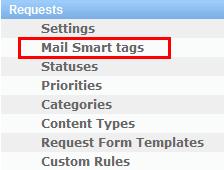
- From this menu you can see all the available Smart Tags. Edit them by clicking the edit button.
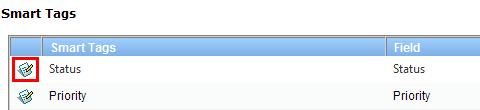
After clicking the edit button it is possible to enable/disable Smart Tags, as well as change it's name.

To use a smart tag to edit a field of a Request
- Send an email or Request to a user and include a Smart Tag above or between the appropriate delimiters with the sytax {SmartTag: desiredvalue};
- Beginning with version 5.2, End Users are able to send an email with a Smart Tag to update a field.
- The Request will be updated with the given value for the field that the Smart Tag represents.
- Note that spelling is important.
- For a Single Select or Multiple Select fields, the smart tag must be a pre-existing value in the field.
Below is a table of common examples of smart tags for Pre Defined and User Defined fields and their usage.
| Field | Field Type | Field Data Type | Smart Tag Syntax Examples |
| Status | Predefined | List | {Status: Closed} |
| Priority | Predefined | List | {Priority: Low} |
| Category | Predefined | List | {Category: a Category value} |
| Product | Predefined | List | {Product: a Product value} |
| Content Type | Predefined | List | {ContentType: a Content Type value} |
| Group | Predefined | List | {Group: a Group value} |
| Resolution | Predefined | Memo | {Resolution: Some text I want to place into the resolution field} |
| User Defined Text Field | User Defined | Text | {Text Field Name: Some text I want to place into the TextField} |
| User Defined Single Select Field | User Defined | List | {Single Select Field Name: a Single Select value} |
| User Defined Multiple Select Field | User Defined | List | {Multiple Select Field Name: a Multiple Select value} |
| User Defined Date/Time Field | User Defined | Date/Time | {Date-Time Field Name: Some Date/Time value}
(Formatted like: 12/25/2019 00:00:01) |
| User Defined Date Field | User Defined | Date | {Date Field Name: Some Date value}
(Formatted like: 12/25/2019) |
| User Defined Numeric Field | User Defined | Numeric | {Numeric Field Name: some numeric value} |
| User Defined Checkbox Field | User Defined | Boolean | {Check Field Name: True} |
| User Defined Memo Field | User Defined | Memo | {Memo Field Name: Some text I want to place into the MemoField} |