Step 3 - Edit Required Request Settings for Novo Mail Integration
Purpose: To ensure Requests interact with the Novo Mail Service. When a Request email notification is received, the end user can add comments to the Request by simply replying back to the email. The Novo Mail Service recognizes that this is a reply from the the end user (Contact) and inserts the comments in the Notes field.
Prerequisites: Novo Mail Service purchased and the end user must be listed as a Contact.
Steps:
Configure the Application to create Request notes from replies to Confirmation Emails
- Browse to Admin>Setup>Core/General>Settings
- Enter the email address that Novo Mail will monitor into the Administrator Email Address field; save the settings
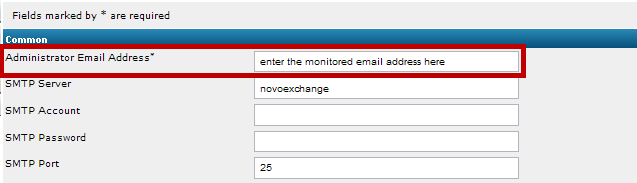
This will ensure that replies to confirmation emails will be sent "to" the monitored account. - Browse to Admin>Setup>Requests>Settings; scroll down to Email Settings
- Enable Send Auto Confirmation Email to Contact to send end users a confirmation automatically when they create a Request either from the app or by mail.
- Edit the contents of the Contact Auto Confirmation Email Text field to include one or both of the the reply delimiter options that are configured on the Incoming Email Settings page.
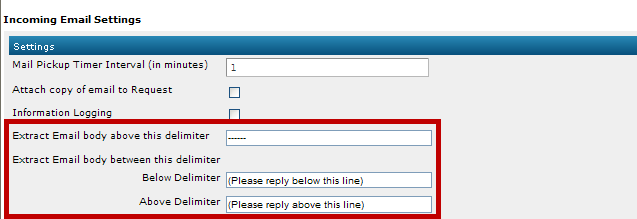
- The content of the field is optional, but the Novo Mail Service looks for the delimeters exactly as they are found in the Incoming Email Settings page. Given the example above, either of the Confirmation Email texts below would populate a note into the Request:
Option 1
Hello,
We have received and are reviewing your support request. We will contact you shortly if more detailed information concerning this issue is required. If you would like to reply to this email:
(Please reply below this line)
(Please reply above this line)
This will update the Request with your reply. Because your reply will be automatically processed, you MUST enter your reply in the space provided. Text entered into any other part of this message will be discarded.
Sincerely,
Customer Support
Option 2 (Note the 6 dashes above the word "Hello")
------
Hello,
We have received and are reviewing your support request. We will contact you shortly if more detailed information concerning this issue is required.
Sincerely,
Customer Support
- The Novo Mail Service will create a note in the Request with text that is found between the below/above delimiters *or* above the dashes.
Configure the Application to create Request notes from replies to Requests that are sent as Updates from Technicians
- Browse to Admin>Setup>Requests>Settings; scroll down to Email Settings
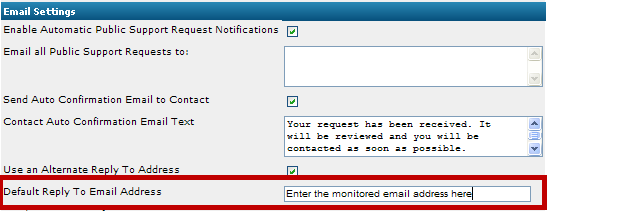
- Enable Display Reply To in Request Popup and provide the email address that Novo Mail will monitor in the Reply To Email Address field. When customers reply to messages that are sent from Requests, their replies will go to the monitored account.
When the Novo Mail Service sees a Request ID in the correct format on the subject line of an incoming email (i.e: [Ticket#897]), the reply will be added as a note to the Request.
Note: The Request ID format that Novo Mail recognizes is configured on the Incoming Email Settings page (Shown below)
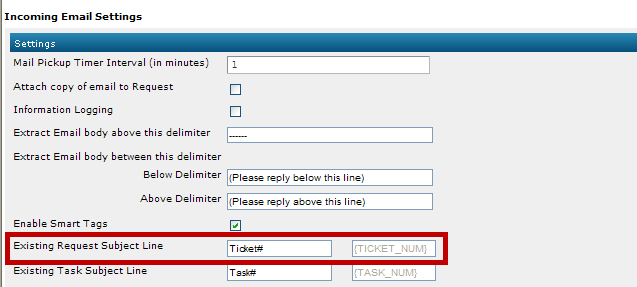
The example above shows the default value of Request#. This will cause the application to send outgoing messages with the subject of the email appended as follows: [Ticket#{the ticket ID}] (i.e. [Ticket#1234] ) - Edit the contents of the Default Message Text in the Send Request Popup to include one or both of the the reply delimiter options that are configured on the Incoming Email Settings page.
- Again, the content of the Default Message Text in the Send Request Popup field is optional, but the Novo Mail Service looks for the delimeters exactly as they are found in the Incoming Email Settings page.
Option 1
Hello,
Your request has been updated. Please see the information below. Please reply to this email with any questions between the following delimiters.
(Please reply below this line)
(Please reply above this line)
This will update the Request with your reply. Because your reply will be automatically processed, you MUST enter your reply in the space provided. Text entered into any other part of this message will be discarded.
Sincerely,
Customer Support
Option 2 (Note the 6 dashes above the word "Hello")
------
Hello,
Your request has been updated. Please see the information below.
Please reply to this email with any questions.
Sincerely,
Customer Support