Tech Tip Compilation October 2006 - Ticket Workflows
Purpose: The WorkFlow module enables you to combine and save commonly recurring tasks to individuals or groups. You can use WorkFlows if you need standardized processes or Tasks to be completed in order to resolve a Ticket. The idea is to create and save WorkFlows that would be frequently used, and then assign them to tickets as needed. When a WorkFlow is added to a ticket, the application can be configured to automatically send email notifications to the associated individuals or groups. It's also possible to automatically assign a WorkFlow to a ticket using the Custom Rules tool. And you can define one or many "on the fly" tasks per ticket as well.
This Tech-Tip will focus on creating and saving a WorkFlow for frequent use, and then adding the WorkFlow to a ticket.
Prerequisites: Initial Novo Software Settings
Creating Ticket WorkFlows
A WorkFlow is the definition of a series of tasks that must be performed to complete some larger task or project and the determination of other parameters such as who should be assigned the tasks, what time frames are given for the tasks and/or in what order the tasks should be completed.
- In order to get to the WorkFlows section, click the WorkFlows Admin menu button to display the following page:
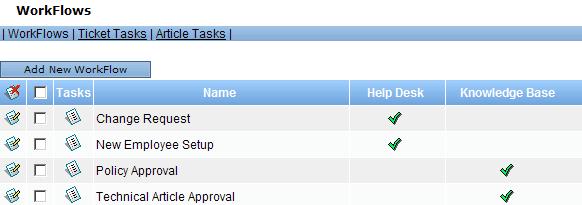
- Click Add New WorkFlow.
- Enter a name for the new WorkFlow.
- Assign it to the Help Desk.
- Click Save.

- Now that the new WorkFlow has been created, click the Tasks Icon to add Ticket Tasks for it, so further on they could be jointly associated with this WorkFlow.
Adding Tasks to Ticket WorkFlows
Tasks are included into the WorkFlow by clicking the Tasks icon. The page will change to display the tasks for the WorkFlow you just created; which is currently blank. Click Add New Task. The page like the one below will display:
Follow the steps below to add a new task:
- Provide a Name for the task. This should be something descriptive like "Initial Article Review", etc. The Name is the only required field to create a task.
- Provide a Description of the task. If there are specific instructions to complete this task, they can be included here.
- Provide a Time Frame for the task. This should reflect how long the assigned user will have to complete the task "after" it is initiated.
- Once the first task is defined, you will be able to select it as a Predecessor task. When this WorkFlow is implemented, the software will calculate the current task's Due Date using the predecessor's Time Frame. If Task A has a Time Frame of 1 hour, and Task B has a Time Frame of 1 hour, the Due Date for Task A will be 1 hour after initiation of the WorkFlow and the Due Date for Task B will be 1 hour later.
- If you choose not to select a predecessor, select Flexible for the Start Date Calculation method. Then this task's Due Date will be calculated from the initiation of the WorkFlow no matter where it is in the list.
- Select a User that will be assigned to this task. This user will be notified when the task is initiated.
- Select the Group that this task is associated with.
- If you wish, you can choose to notify just the User, the entire Group or no one.
Initiating a WorkFlow using a Custom Rule
The easiest and most expediant way to initiate a WorkFlow, is to create a Help Desk Custom Rule that will automatically add the WorkFlow to the ticket. You access the Custom Rules tool at Admin->Setup->Custom Rules: Help Desk. Click Add New Custom Rule, the Custom Rule Definition page will appear.
The example above shows that if an ticket is modified and it belongs to the Human Resources group, and the Problem/Issue field contains the string "Inprocess Employee", then the Add New Employee WorkFlow will be added when the ticket is added.
Manually Initiating a WorkFlow while Editing a Ticket
- You can add a WorkFlow manually while editing a ticket by expanding the Tasks area, then selecting a WorkFlow and clicking Add.

- Once the WorkFlow is added, you will see the associated tasks below it.
- You can also create "On the Fly" tasks to be added to this ticket's WorkFlow by clicking Add New Task.
Note: To use WorkFlows, you'll need to purchase the module. If you have any questions or would like more information, contact our sales department at sales@novosolutions.com or (888) 316-4559.