Creating a Submission Form to Email the Novo Mail Service Monitored Email Account
Purpose: This article will explain how to create a Novo Mail HTML Adapter (Mail Adapter) and how to implement it with software.
Prerequisites: Novo Mail Service, Knowledge Base, or Html compatible Website
Steps:
Table of Contents
Introduction to the Novo Mail HTML Adapter (Mail Adapter) Back to Top
An enhancement has been added to the Novo Application to allow a simple Html Form to interact with our Novo Mail Service. Even though this article is extensive, the enhancement itself is relatively small.
The Mail Adapter provides the ability to create a Help Desk or Change Management Request from any Knowledge Base Article or Html compatible Website Page. The Mail Adapter Forms will be submitted as a Html Form to the Novo Mail Service and create a Request based on the information entered by the Form.
Step 1: Modifying the Send_Form.asp Back to Top
If you are hosted with Novo Solutions, or if your Novo Application is behind a Firewall please contact Novo Support to start the process of enabling the Send Form functionality.
Download the send_form.asp attachment from this article and un-zip it
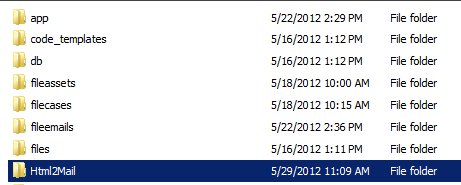
Next we need to create a directory named Html2Mail, this can be placed anywhere except in your {Novo_Root}/App folder. This is because the App folder and all its sub directories are overwritten during upgrades. For the purpose of this turorial i have placed the directory in my {Novo_Root} on the same level as the App folder
Copy & paste send_form.asp into that folder
Right click the file select Open With > Notepad
Set the desired ConfigItems
ConfigItems are settings used to send the information given in the Mail Adapter Html Form. This is information you may not wish to have visible in the Html of a page.
Note: All config items will be overridden by the Mail Adapter Html Form fields with the same name. I.e. Setting mail_to as a hidden field will overwrite the mail_to defined in the configItems.
Note:If you do not want to use one of the configItems, or it is not needed set it = "".
* - Marks required items
| ConfigItem | Description |
| mail_server * | The server name that will be processing the email sent via the Mail Adapter. Can be found by navigating Admin>Setup>Core/General Settings: SMTP Server |
| mail_account | The Email account that has been configured for Novo Mail Service that will be processing the email sent via the Mail Adapter
|
| mail_password | The password to the mail_account. |
| mail_port | The port you wish for the email to be sent from. |
| mail_from_address | The email address you wish the email to be sent from. |
| mail_from_name | The name associated with the mail_from_address. |
| mail_to | The monitored email account you wish the email to be sent to. |
| mail_cc | The email address(s) that will be displayed in the CC field of an email. Note: This will send a copy of the email to all email addresses listed in this field. |
| mail_subject | The subject line that will be displayed in the Subject field of an email. |
| mail_redirect | The Url you wish to redirect to after the form has been submitted. |
| success_message | The message you wish to display when the email has been successfully sent. Note: Basic Html is accepted. |
| txtCaptha | Used to assist the Html form to communicate with Captcha, please do not change its value. |
If you wish you may set required Items in your form, scroll down to Required Items section around line 29
Note: A form will fail to send if the required field is not defined and set on the Mail Adapter Html Form.
requiredItems = Array("required_item, required_item, required_item ...")
Next we have to set the Valid Referes by scrolling down to the Valid Referes Section of Send_Form.asp
Note: A form will fail to send if the url of the form is not added to ValidReferes.
'*******************************************************
'Check valid referers
'*******************************************************
Under that section there is a line of code: ValidReferers = "", this is where you will declare the urls for your forms
Ex: ValidReferers = "http://site/subdomain/*,http://website/*"
Use a ',' to separate urls (see example above)
Use the wild character '*' to tell the code that what comes after does not matter I.e. If there is a session ID that will change for each user
If the "Extract Email body above this delimiter" Setting in Admin>Setup>Core/General: Incoming Email Settings has been changed. Alter the text around line 102 to match the value in that settings field.
"------" & vbcrlf
<!--Delimiter, Replace the text '------' with your new delimiter-->
Step 2: Creating the Html Form Back to Top
Note: The steps below describe how to make an Html Form in a Novo Knowledge Base Article. If you would like to add the Html form to a Website page click for a Sample Mail Adapter Html Form to get you started.
Navigate to Articles from the Top Navigation Menu
Add or Edit an Article and click the  button
Once the editor has opened there is a particular bar that holds the controls for Form elements

Click the  button to create a Form
In the subsequent Form window fill in the properties as guided below
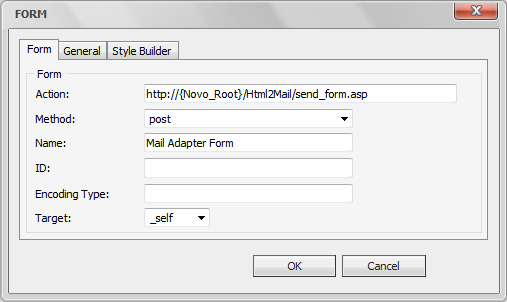
For Action there are two possible URLs
If your application is hosted by Novo Solutions use the following URL
http://support.novosolutions.com/Html2Mail/send_form.asp
If you application is In-House use the following guideline
http://{Novo_Root}/Html2Mail/send_form.asp
Note: If Active Directory is set up Anonymous Access must be set to Enabled in IIS if you want this form to function for public users.
For the method select "post"
Set the Form's "Name"
The form's ID is not necessary unless advanced css styles have been created
Set the target of the Confirmation dialog
_self - Opens the linked document in the same frame as it was clicked
_blank - Opens the linked document in a new window or tab
_top - Opens the linked document in the full body of the window
_parent - Opens the linked document in the parent frame
Click "Ok" to finish, or click on the General or Style Builder tabs to add more customization
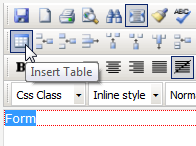
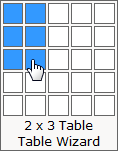
- Create a Table to hold the Form Elements by clicking inside the red Form outline and clicking the insert table button
- Create a table with at least two columns and a few rows the first column will be used for labels and the second will hold the fields
- Click the second column and select a Form element from the Form Tool bar
Note: Hovering over the control will display the control name I.e Text Area, Text Box, Password Field, etc...
- In the resulting window enter the Controls properties
Note: The name of the control should have no spaces. This will be the name used to create a User Defined Field (UDF) in Step 2.
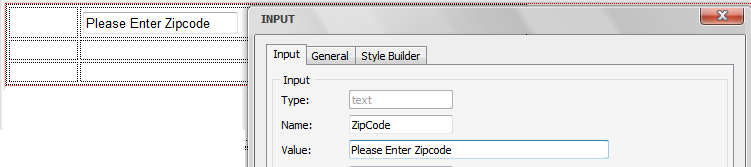
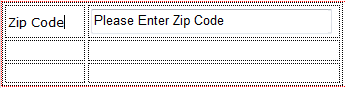
- Click the first column and enter a label for your field
- Repeat the process until all Form elements are in place
Important! The form needs a text field named mail_from_address for the email to submit successfully. In the next step even though Email Address is the label on the form, the name of the field is mail_from_address.
- Add a submit button by clicking the "Submit Button" control on the tool bar
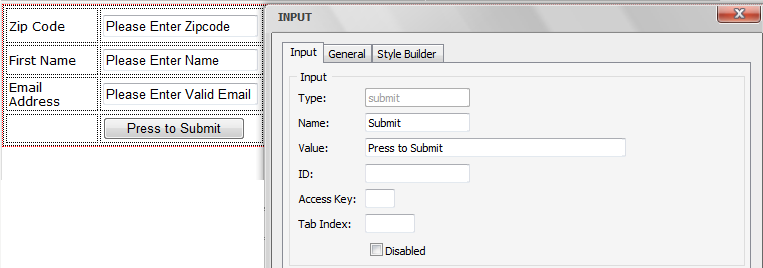
Click anywhere in the Red Form outline
Click the Hidden Field control in the Form Toolbar

In the resulting window insert the following information
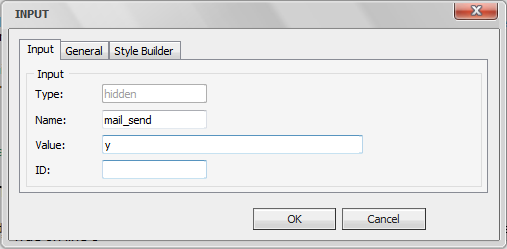
Important! Without this hidden field the form will not submit successfully
Click Ok to Finish
Note: If you would like to submit extra information that you do not wish for the user to see or manipulate; Use the hidden field form control and insert the desired information in the value section.
Step 3: Setting the Html Fields to be picked up by the Novo Mail Service Back to Top In order for the Application to recognize the fields being sent via the Mail Adapter they need to be created as User Defined Fields (UDF)s and Enabled as Smart Tags.
Note: UDFs must be enabled in Admin>Setup>Core/General Settings:
Navigate Admin>Setup>Request: User Defined Fields
Click Add User Defined Field
For the label field, use the desired Input Name from the Form
Note: This must match the Input Name exactly.
Example:
<input name="Issue" type="text" />
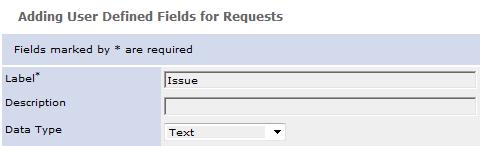
Select the Data Type to match the Input Type on the Form
Fill in the rest of the information as needed
Click "Save" to Finish
If the Field is a drop-down:
Create the UDF as a Single-Select
After it is saved click on the Icon in the List Values column
Click Add New Value
For Value, type in the Option Name from the Form
Click "Save" to Finish and repeat for each drop-down value
Note: After the Mail Adapters Html Field Names have been created as User Defined Fields (UDFs), they must be enabled as Smart Tags for the Novo Mail Service to associate the values entered on the form with their corresponding fields.
Note: The Novo Mail Service must be enabled in Admin>Setup>Core/General>Settings: Other. Smart Tags must be enabled in your Admin>Setup>Core/General: Incoming Email Settings
Navigate Admin>Setup>Requests: Mail Smart tags
Click the Edit icon for each of the User Defined Fields on your form
Click the on the right side under the header Enable
Click the Save Icon next to your fields name 
Your UDF is now enabled as a Smart Tag, continue these steps for all UDFs that you wish to function as a Smart Tag
Step 4: (Optional) Setting a Basic Captcha Test Back to Top
The Captcha that is included in the Documents that were downloaded, is a free version. It will provide basic human testing to help prevent certain cyber attacks.
Download the Captcha attachment from this article and un-zip it
Copy & paste the folder into your {Novo_Root}/Html2Mail/ directory
Click the link for the example Html Form and download the attachment
Copy and past the Captcha code around lines 5 and 89 into the Html of you form
Note: Please paste them in the same area that they are located in the Sample Html Form.
Save the Form/Page.
Navigate to your {Novo_Root}/Html2Mail/ directory
Right click send_form.asp and Open With > Notepad
Set EnableCaptha = True on line 8
Save Send_Form.asp
Step 5: Setting Up IIS to point to Html2Mail Back to Top
In order for the form to communicate with send_form.asp IIS needs to be setup to point to the Html2Mail directory.
Navigate to the Server you have hosting your Novo Application
Click Start>Administrative Tools>Server Manager
Click Roles/WebServer(IIS)>Internet Information
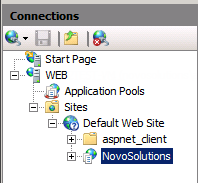
In the Connection window expand the connection used to host your Novo Solutions Instance
Expand down to the Website you are using to host the Novo Solutions Instance
In my instance this is Sites>Default Web Site
Right Click Default Web Site (or your equivilant), and click "Add Application..."
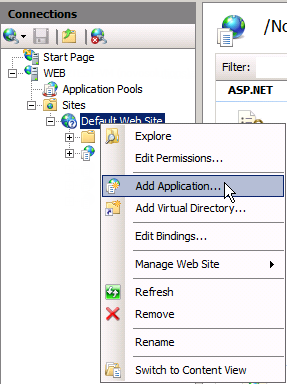
In the resulting window add an Alias "Html2Mail" and select the Physical Path to the Html2Mail directory.
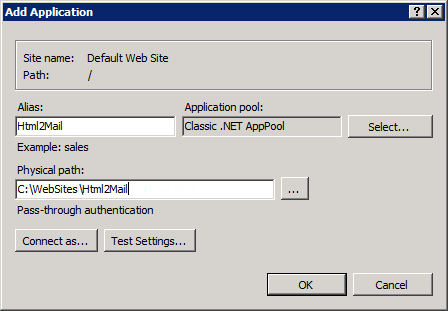
Note: The default Application pool should be the correct one. If you are having issues accessing send_form.asp, select your website and in the Action pane on the right side of the screen select Basic Settings. In the resulting window you should be able to see which Application Pool your site it using.
- Click "Ok" to Finish
Sub Articles
 bin
bin