How to update Requests using Smart Tags
Purpose: To Update Requests with Smart Tags to set Priority, Associated Group, Category, etc..
Prerequisites:
- Set Delimiters in Incoming Email Settings Admin>Setup>Core/General>Incoming Email Settings
- Enabled Smart Tags and UDF's Admin>Setup>Requests>Mail Smart Tags
Steps:
- Send an email from a valid admin user with the following parameters:
- To: the monitored Email Account associated with Requests
- Subject: Must have format from IncomingEmailSettings and contain the Request number of the Request you want to update

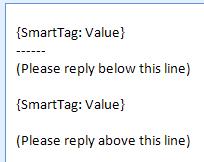
- Body: Add Smart Tags using {SmartTagName: Value} format (i.e. {Priority: High}). The Smart Tags must be placed above the Above Delimiter or between the Between Delimiter and can be any tag that is found in the list at Admin>Setup>Requests>Mail Smart Tags. However, note that the field to which the Smart Tag refers, will need to be enabled on the Request's Template.
- Send the Email
What Happens Next?
If you are a valid Admin User and the Request your are updating exists, the Request's Smart Tag field should be updated within the time frame of your Mail Pickup Timer Interval. If Information Logging is enabled there will also be a record of the update in your email history log. Note: Beginning with version 5.2, End Users will be able to update Requests using Smart Tags.
If you are experiencing problems:
- Check the Email Service Log Admin>Management>Core/General>Mail Service Log
- Ensure the Email Account is enabled Admin>Setup>Core/General >Incoming Email Settings
- Ensure your Mail Service is working