Creating a Request
Purpose: To create a Request.
Prerequisites:
- Novo initial software settings
- The Request Manager is licensed
- Enable Requests is checked in Admin->Setup->Core/General->Settingsl->Other
- Module Configuration
Method 1 -
Notes: The following steps assume that Admin->Setup->Settings: Helpdesk Enable Required Contacts is *not* enabled.
- In the Manage Requests window, click on the Add a Request button.
- The Edit Request window will open with no Contact associated.
- Complete the Problem/Issue field and any other required fields.
To associate a contact with this Request
- Click the Add Contact icon toward the upper right of the Request.
 This will open an Auto Complete text field.
 - Start Typing your Contact's name, when there is a match a drop-down will appear with suggestions.
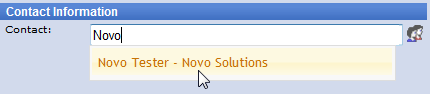
- Click the correct option
- Your contact has now been associated to the Request
Method 2 -
Note: The following steps assume that Admin->Setup->Settings->Helpdesk Enable Required Contacts *is* enabled.
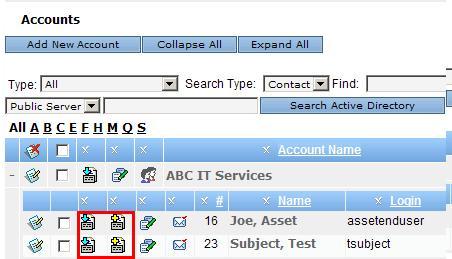
- Click Accounts.
- Expand the Account that contains the Contact for whom you want to create a Request by clicking on the (+) to the left of the Account record.
- Then click on the Add a Request Icon
 to the left of the contact's name.
 - To see all Requests for an individual, click on the View Request History icon
 to the left of the Contact name.
 - To see all Requests for an Account, click on the View Request History icon to the left of the Account name.
- Or, if you have Flat Contacts enabled, simply find the Contact. You can search for Accounts or Contacts; or, use the Alpha and Type filters to shorten the list.