Create and Edit Request Management Statuses
Purpose: Explain how to create and use Request statuses. Statuses are used to communicate the "state" of a Request based on the actions taken to resolve an issue, inquiry, or activity.
Prerequisites: An Admin User must have the "Manage Requests Status" permission enabled.
Default Statuses: Their are four default statuses that come with the software (New, Open, Reassigned, and Closed). These statuses are linked to specific functions and should not be edited. The labels should only be changed if the software is being used in a language other than English.
Creating User Defined Statuses:
- Browse to Admin->Setup->Requests->Statuses.
- Click the Add New Status button.
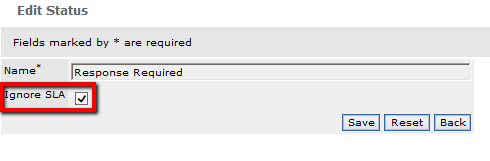
- Enter the name for the Status.
- If you are not going to use the Ignore SLA feature then click Save.
- Using the Ignore SLA feature (logging Status changes for SLA Tracking): A common issue when using Novo in conjunction with a Support Company's Service Level Agreements (SLA) is that there is no way to account for any time that is spent waiting for feedback from a customer. Now you can track that time. To meet this requirement, we've added the ability to: 1) set a Status to Ignore SLA; 2) view Status changes on individual requests, and 3) create reports showing 'Time on Status'.
- Check Ignore SLA checkbox for status where the support organization will not have the responsibility for the request. Use this for when a long time wait (i.e. waiting for a customer to resond) could inappropriately breach a contract.
- You can also create Custom Status Filters that will show up in the Status Filter list on the Manage Requests page.
- Click the Add Custom Status Filter button
- Name - enter a name for the filter
- Status - move the desired statuses to the right text box
- Click Save
- Whenever a status change is made to a Request, it is recorded in the Status Log. The Status Log can be viewed when you click the Edit icon for a Request.

- You can also create a report on "Status Changes" and "Time on Status." These fields can be selected when you are in Step 2/Select Report Columns of creating a report.
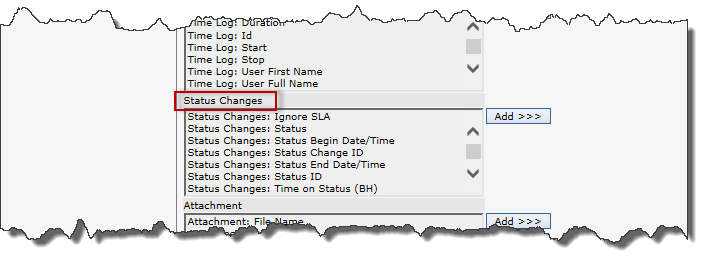
Note: 'Time on Status (BH)' will give you how many 'Business Hours' a Request statyed at a status.
Note: Not show but also available is - 'Total Time on Status'.