Create and Edit Priorities
Purpose: To create defined priority levels that can be assigned to Requests. Priorities allow you to manage and determine the order in which Requests are processed.
Prerequisites: Admin Users must have "Manage Priorities" checked their respective Role.
Steps:
- Click Admin->Setup->Requests->Priorities.
- Click the Add New Priority button.

- Type the name of the priority.
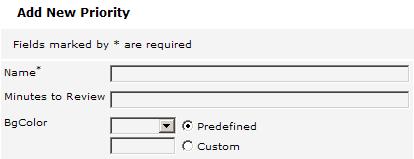
- Type the minutes to review.
- Select the background color (bgcolor).
- For the background color you have the option of choosing from a predefined list of colors or using a custom. The custom color you must know the hexidecimal code for the color.
- Then press 'Save'.
- You are now back at the priority screen.
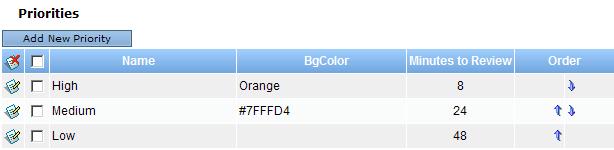
- If the order of the priorities need to be changed, click the up or down arrow (depending on the way you would like the priority to be moved) on the right side of the priority. Each time the arrow is clicked, the priority will move 1 position.
- Once the priority has been created, you are able to edit it by clicking the edit image to the left of the priority name.
- If the priority needs to be deleted, click the box to the left of the priority name, then press the delete image.
The result will be a new priority in the priority drop-down list on the edit Request screen.
Sub Articles
 Hours/Minutes To Review CSS/Help Desk (previous versions only)