Configure MS Index Server to Search Knowledge Base Attachments on Server 2003
Purpose: To Configure MS Index Server to Search Attachments in the Novo software.
Prerequisites: Novo installation
NOTE: MS Index Server does not support Office Documents created with the *.***x extension; (i.e. *.docx, *.xlsx, *.pptx, etc.) If you will be using MS Office documents with these extensions, please follow the instructions for using Windows Search instead.
After the software is installed, three additional components need to be configured to enable Attachment Searching (MS Office and PDF docs). These 3 components are:
-
MS Index Server needs to be installed (if it is not already) AND configured for indexing the attached files directory.
-
-
Enable Attachment Searching needs to be checked in the Admin -> Settings section of the software.
Follow the steps below to check if MS Index Server is installed (it most likely is). See the screen shots below as an example.
-
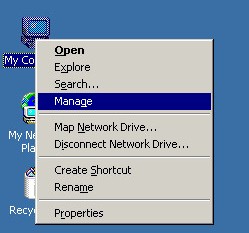
Right Mouse click on My Computer (OR Click Start -> Programs -> Administrative Tools -> Computer Management)
-
Click Manage
-
Click the + symbol to the left of Services and Applications
-
If Index Service is listed then it is installed
-
If it is not listed you can install it through the Add/Remove Programs - Windows Components option.
Steps:
- Configure the Index Service as a Dedicated Service. Note: If this is not done, there will be a delay in the scanning and indexing of your attachment files.
- Right Mouse click on My Computer
- Click Manage
- Click the + symbol to the left of Services and Applications
- Right Mouse click on Index Service (you will temporarily need to Stop the service to check/tune the performance). Click Stop
- Right Mouse click on Index Service again and click All Tasks and then Tune Performance.
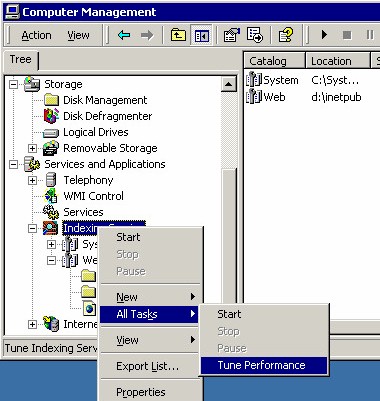
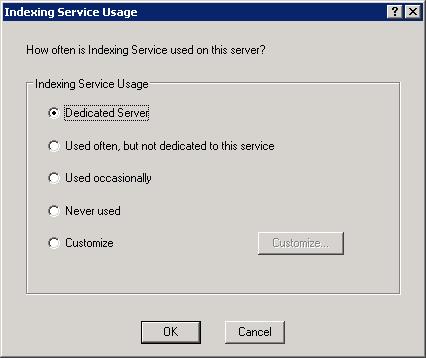
- The Indexing Service Usage window is displayed (see screen shot below)
- Click Dedicated and then click OK. This will ensure that attachments are scanned and indexed as they are added.
- Restart MS Index Service
- Right Mouse click on My Computer
- Click Manage
- Click the + symbol to the left of Services and Applications
- Right Mouse click on Index Service (you will temporarily need to Stop the service to check/tune the performance). Click Start
- Add the Knowledge Base attachment directory (i.e. novo\files) and an External path (optional) to the Index Server Directory list.
- Right Mouse click on My Computer
- Click Manage
- Click the + symbol to the left of Services and Applications
- Right Mouse click on Index Service
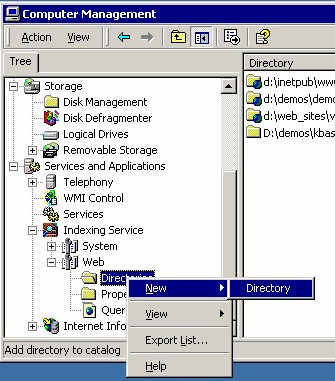
- Click the + symbol to the left of Web (NOT System)
- Right Mouse click on Directories (do not create a new catalog)
- Click New -> Directory
- In the Add Directory window, click Browse and locate the {path}\novo\files directory (where path_name\novo is the directory where the Novo software is installed) or an External Path on the file system.
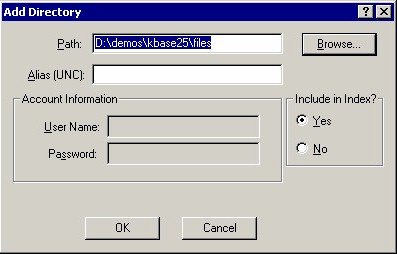
- Click OK
- Install Adobe iFilter
- Double click on the ifilter installation file and follow the on screen installation options. This file can be Downloaded Here.
- Login to the Novo App as a Super Admin and browse to Admin->Setup->Knowledge Base->Settings. Scroll down to the Search Settings section and Enable "" by placing a check beside it.
- Enter the External Path file system location into the External Path field.
- Create an article and attach an MS Word, Excel or PowerPoint file or an Adobe PDF file. After the attachment is uploaded, wait a minute or so and search for text in this file.
- Place a document into the External Path file system location, wait another minute or so and search for text in this file.
- Below are some common errors encountered when working with attachments in the Novo software:
- 007~ASP 0104~Operation not Allowed~ (when uploading files) or VBScriptError: File not found (Error 1040) Error opening 'C:\xxx\yyy.ext. Error 32 The process cannot access the file because it is being used by another process (when downloading)
- By default the web server does not allow attachments larger than 204k (approx) to be uploaded. There is a similar restriction on downloads. See the related articles below for instructions on how to change the upload and download limits.
- Object Required
- Re-register the upload componant:
- Open a command prompt and type cd c:\path_to_the_software\com\ (i.e. c:\Program Files\novo\com)
- type: regsvr32 aspSmartUpload.dll
- Ensure that there is a copy of aspSmartUploadUtil.dll in the c:\windows\system32 folder (there is no need to register it)
- File not found: aspsmartuploadutil.dll
- Ensure that there is a copy of aspSmartUploadUtil.dll in the c:\windows\system32 folder (there is no need to register it