Assigning Users as Language Translators
Purpose: To assign translators to articles needed translation.
Prerequisites: Novo initial software settings, Module Configuration, Article to be translated.
Steps:
- Log in to the Knowledge Base as a Super Admin.
- Click on Admin->Permissions->Users.
- Click on the Edit icon
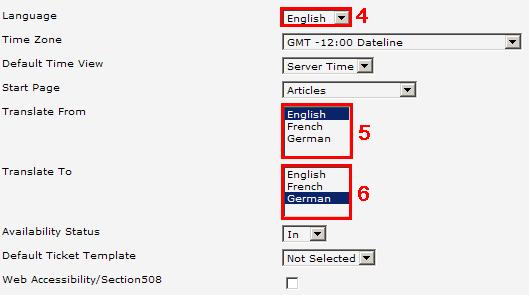
 next to the user name to whom you want to assign specific language and/or translation settings. The Edit User window appears as shown below.
 - Select "English" from the Language drop-down list.
- Select "English" from the Translate From drop-down list.
- Select "German" from the Translate To drop-down list.
- Click on the Save button to complete the language assignment.
Translating Articles
When an article is assigned to a language translation, then created or edited and saved, the system sends an email to the appropriate translator (as defined in the User properties shown above). The translator receives the source article as an attachment, with a link to the list of articles needing translation.
- Translators click on the link in the email they receive. This link takes them directly to the articles awaiting translation.
- Click on the View icon to the left of the Article title (the source article is opened in a new window). This window can be re-sized to take up a portion of the screen (1024 x 768 or higher screen resolution is recommended for translating articles).
- Click on the green circular arrows (translate) to create a new article and begin translating.
Note: If the Article Navigation Tree has been translated using the translation workflow, the source (English) tree folder is linked to the other language. If this has been done properly, the Add Article (to add the translated article) will appear in the proper location on the Article Navigation Tree (it remembers where it should be located).