Step 1: Add/Edit Article Properties
Purpose: To edit an article's properties
Prerequisites: Knowledge Base; Article Edit Privileges
Steps:
- Click on the article to be edited (it will appear in bold letters in the Left-side Navigation Tree).
- Click the Edit button in the button bar located at the top of the article.
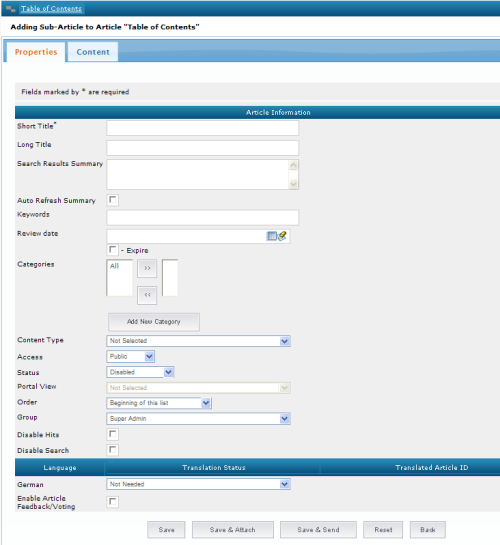
- The Editing Article window opens as shown above. This image shows all possible property fields. Certain fields and buttons may not be shown in your software if they are disabled in Knowledge Base Settings, are not allowed because of Role/Permissions or are not granted in the license. Field descriptions are below:
| Field | Description |
| Short Title | Your Short Title is what appears in the Left-side Navigation Tree (this is the only required field). |
| Long Title | This more detailed title that appears in the display area and in the search results. If the Long Title is left blank, the Knowledge Base will default to the Short Title. |
| Search Results Summary | This short description is used for search results only. The description appears under the Long Title in a search results.
Note: If you leave this field blank, the Knowledge Base automatically adds the first 200 characters of your content when you save the article. |
| Auto Refresh Summary | The contents of the Search Results Summary is refreshed when the article is saved. |
| Keywords | Use this field to boost an article's relevency for certain search terms found in the content. Specify additional search terms or phrases that do not appear in your titles or content, but are relevant to a search. The Keywords field can hold up to 255 characters including spaces. Separate keywords or phrases with a comma. |
| Review Date | Enabling the Review Date allows you to assign a date to either Review the article or Expire the article. Expired articles are not displayed in the Public/External view. Click on Admin->Review Articles to view which articles have been marked for review. |
| Categories | Categories are used specifically to narrow search results on the Advanced Search page. Category Features: - You can select multiple Categories
- In the Edit Article page and the Advanced Search page, select the Category, then click on the Right Arrow button >> to add the Category to the list
- Click on the Left Arrow button << to remove selected Categories from the list.
- Categories are displayed in a pull-down list in the Advanced Search page.
|
| Content Type | Used in conjunction with unlimited Categories and Sub-Categories, Content Types help users refine their searches. In the example above, Categories are used to deliniate general subject areas. Content Types indicate the article style or type. |
| Access | Set the articlepermissions using this field. Choose whether the article will be viewable to the: - Public -- anyone viewing your website (accessible at http://....../kbase), or for employees if used for internal purposes.
- Portal View -- viewable by any logged in End User Contact that is associated with the Portal View selected in the Portal View drop down listed below AND viewable by all Admin Users
- Intranet -- viewable only by your knowledge base viewers/editors/administrators (people logged into the system accessible at http://....../kbase/admin.
- Group -- if the access is Public/Disabled the article is only viewable to people in your Group.
- Private -- viewable only by the author.
|
| Status | - Disabled -- not active or publically viewable at http://....../kbase.
- Enabled -- viewable to the appropriate Access Level group).
- Awaiting Approval -- documents are not publicly viewable and are kept in an awaiting approval status until an authorized user approves the article.
|
| Portal View | Select the Portal View where this article will be enabled. Portal Views allow you to place articles into segments, divisions or "Views." Then you can assign authenticated public contacts to these views. See related article for more information about Portal Views. |
| Order | Select where you want the new article placed in the Left-side Navigation Tree to ensure logical information organization. Options include: beginning of the list, end of the list, after existing articles. You can also move the article up or down one level. |
| Group | Use this pull-down list to select the group to which the article belongs. See related article to learn more about Groups. |
| Disable Hits | Check this box to keep the article out of hit couts. This ensures that certain Header or Container articles do not show up as most-viewed articles in the Report and Most Popular Articles features on the public side. |
| Disable Search | Check this box to keep Header or Container articles from being found in a search |
| Template (removed in 5.0) | Starting with version 5.0 Article templates are no longer selected from the Article Information page (Properties tab). To select a template, click the Content tab to open the editor then click the Template Manager button on the tool bar. |
| Enable Article Comments | Displays a comment box at the bottom of the article allowing users to provide comments about the article.
Note: If this feature is not visible, ensure "Enable Comments" is checked in Admin > Knowledge Base > Settings > Comments. |
| Enable Article Feedback/Voting | Displays a rating scale and feedback box at the bottom of the article allowing users to provide feedback and rate the article.
Note: If this feature is not visible, ensure "Enable Article Feedback/Voting" is checked in Admin > Knowledge Base > Settings > Feedback/Voting. |
| Language | If the article has been translated to another language using the Article Translation WorkFlow, the translated article's language will appear here |
| Translation Status | Options are Not Needed, Awaiting and Completed |
| Translated Article ID | The ARTICLE_ID of the Translated Article |
The Bottom Button Bar

| Button | Description |
| Save | Saves the article to the database. |
| Save & Attach | What an article is saved, the Add Attachment interface opens. Browse and select a document or file to be uploaded to the current article if desired. |
| Save & Add Task | After saving the article, the Add Workflow Task window will open allowing you to manually implement a workflow or add one or more tasks on the fly. See related article for more infomation about Workflows |
| Save & Send | Marks the article to be sent by email (to anyone subscribing to it) on the next scheduled Subscription distribution. See related article for more information about Subscriptions. |
| Save Draft | Returns the article definition page to its last saved state. |
| Reset | Returns the article definition page to its last saved state. |
| Back | Returns to the previous window. Functions just like the browser Back button. |