Adding and Editing Article Workflow Tasks
Purpose: Adding a task to an article.
Prerequisites:
- Purchase of Knowledge Base Workflows.
- In Admin->Setup->Core/General->Other section, ensure "Enable Knowledge Base WorkFlow" is checked.
- Admin User must have the appropriate Workflow permissions.
Steps: Note: The Tasks button only appears in the Article Options Bar if you enable Knowledge Base workflows. See related article on Workflows for more information. - Click on Admin->Setup->Settings: Core/General. Scroll down to the Other section. Check the Enable Knowledge Base Workflow box.
- Click the Tasks button on the Article Options Bar .

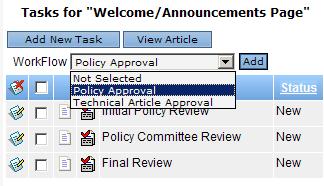
- The Tasks for window opens as shown below. If a workflow is currently assigned to your group, you will see a list of tasks.
- If you want to add a new task, click on the Add New Task button. The Add New Task window appears.

- Enter a name for the task in the Name field.
Note: This is the only required field to create a new task, but consider completing the task specifcations to take full advantage of this feature. - Provide a brief description of the task actions and responsibilities in the Description field.
- In the Start Date field, enable the current date, or the date you want the task to become effective, then check the Enable box.
- In the Time Frame field, enter the time range allowed to complete the task. The format is dd (days, or number of days allowed) hh (hours) and mm (minutes).
- If the task has another task that is a prerequisite for proper completion, select that task from the Predecessor list.
- Select the task status from the Status drop-down list.
- Assign the task to a specific user by selecting the name or title from the Assign User drop-down list. (You are not required to assign a user.)
- Send an email notification to the assigned user or other recipients as needed.
- Click Save to save the task to the list of tasks for the related article.